

Downloadable file
This add-on is available for free on GitHub for Blender 3.0, 2.9X and 2.83. For previous versions, go and check the releases page.
If you want to animate cars but you don't want to spend too much time for rigging, Rigacar could be helpful. It is a free add-on for Blender I developed for one of my projects. Rigacar was designed to fulfill the following goals:
- generate a complete rig as quickly as possible for standard car models
- provide tools to automate wheels animation
- allow efficient animation baking to be able to export animated models into real time renderers
At the end of this documentation, there is a section dedicated to useful advices to create animations and avoid common mistakes.
Before reading this documentation, you can watch my series of videotutorials:
Caution!
These videotutorials are based on a previous version of the add-on for Blender 2.7x and are therefore a little bit outdated. But they should still be helpful. Below is a list of things explained in the videos which are no more relevant:
- Part 1: adding a new rig
- I explain in this video you need to adjust the length of the body bone when you add the armature to indicate the length of your model. This is no longer necessary. Rigacar computes bounding boxes for each reference object and their children to discover the dimension of your model. Naming convention to match objects of your model with the main parts of the rig is now case insensitive.
- Part 2: adjusting the rig
- Adjusting widgets could still be necessary but Rigacar is now able to place widgets at a fair location.
- Part 3: animating along path
- No need to adjust the delta location of your armature after adding a follow path constraint. Origin point of the armature is adjusted automatically at generation time.
- Part 4: slamming on brakes
- Brakes have their own animation widgets now.
Prepare your model
Downloadable file
You can download the blend file with the model and the complete rig. Don't forget to download and install Rigacar. Nice BMW27 model used in this article is a modified version of the one available in the Blender demo files. Thanks to Mike Pan for creating and sharing it.
Rigacar expects your model is oriented along the -Y axis and the wheels lay upon the grid floor. This way, the front of your model matches the front view in Blender. If it is not the case, you should rotate your model to match this orientation. Of course, don't forget to apply rotation and scale on your model.
Once you have installed and enabled the add-on, you should follow these steps:
- prepare your model and ensure you have followed the naming convention to let the add-on discover the structure of your model
- add the deformation rig
- generate the final animation rig
- tweak the rig and, optionally, extend the rig for your own purposes
Use naming convention for reference objects
Before adding the rig to your scene, I highly recommend to adjust your model and to follow a naming convention for each part. This way, Rigacar will be able to analyse your model and to create an accurate deformation rig.
Rigacar is able to identify reference objects based on their names. Reference objects are objects used for the body, the wheels and the brake wheels in your model. The name for these reference objects should be suffixed according to the rules describe in the following table:
| Suffix | Part of the model | Example |
|---|---|---|
| body | The Body of the model | mycar-body |
| wheel.Ft.L | The front left wheel | mycar-wheel.Ft.L |
| wheel.Ft.R | The front right wheel | mycar-wheel.Ft.R |
| wheel.Bk.L | The rear left wheel | mycar-wheel.Bk.L |
| wheel.Bk.R | The rear right wheel | mycar-wheel.Bk.R |
| wheelbrake.Ft.L | The front left brake wheel or any part associated with the wheel which does not spin | mycar-wheelbrake.Ft.L |
| wheelbrake.Ft.R | The front right brake wheel or any part associated with the wheel which does not spin | mycar-wheelbrake.Ft.R |
| wheelbrake.Bk.L | The rear left brake wheel or any part associated with the wheel which does not spin | mycar-wheelbrake.Bk.L |
| wheelbrake.Bk.R | The rear right brake wheel or any part associated with the wheel which does not spin | mycar-wheelbrake.Bk.R |
Name matching is case insensitive and you can use dot, space, dash or underscore as separators. Following names are all valid: mycar.Wheel.Ft.L, mycar-wheel-Ft-L, mycar wheel fr l, mycar_WHEEL_FT_L
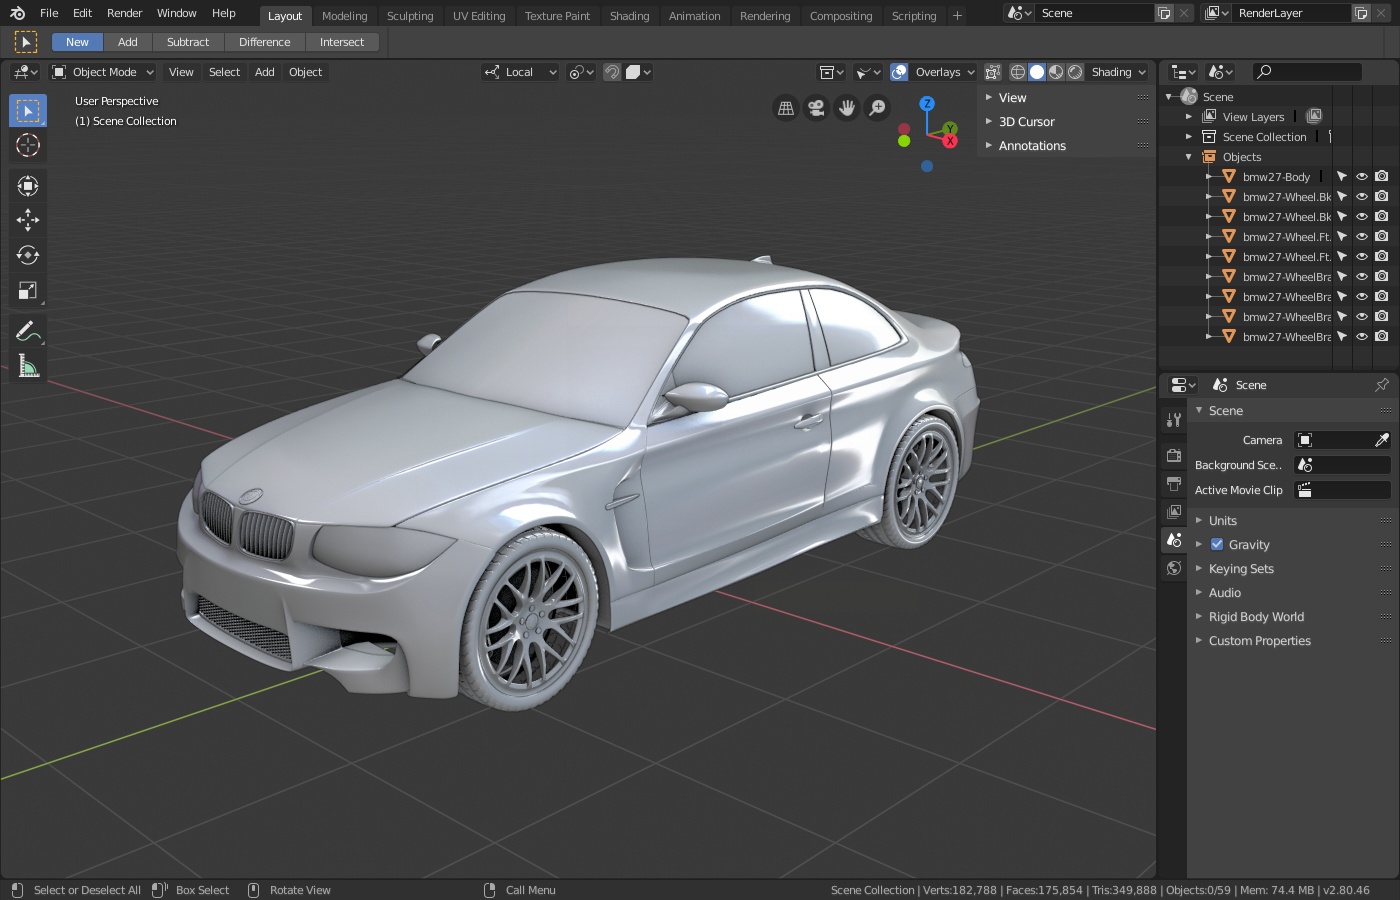
You may have multiple objects for each part. For instance you may have one object for the wheel rim and another for the tire. Consider one of these as the reference object and name it according to the convention. Then parent the others to this one. See below as an example, the outliner for the scene used in this article:
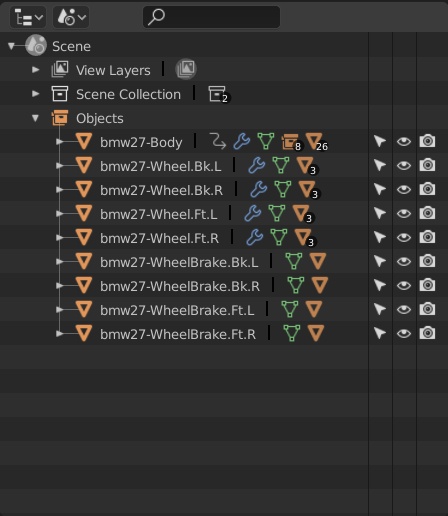
If your model has more than one pair of wheels at front or at rear, use the same convention as Blender: add a number with 3 digits at the end: mycar-Wheel.Ft.L.001, mycar-Wheel.Ft.R.001, mycar-Wheel.Ft.L.002, mycar-Wheel.Ft.R.002...
If some of these objects do not exist, Rigacar will adjust the rig. For instance, you can create a valid rig for models with no brake wheel. You can even use Rigacar for models without any front wheel or back wheel (or even no wheel at all... even if I doubt your model should be some sort of car).
Caution!
Known limitation: do not parent your reference objects (body, wheels, wheel brakes) to anything before adding the rig. It could generate errors or an incorrect rig.
Check origins
Rigacar will use the origin point of each reference objects to locate the generated bones. Before adding the deformation rig (see the next section), you should check the origin of each of them:
- Reference object for the body
- The origin indicates the location around which the model will pitch and roll.
- Reference object for the wheel
- The origin indicates the center of the wheel which is the intersection of the spinning axis and the steering axis (only for front wheels)
- Reference object for the brake wheel
- The origin should be the point of the attachment of the brake wheel. You should align it with the origin of the wheel.
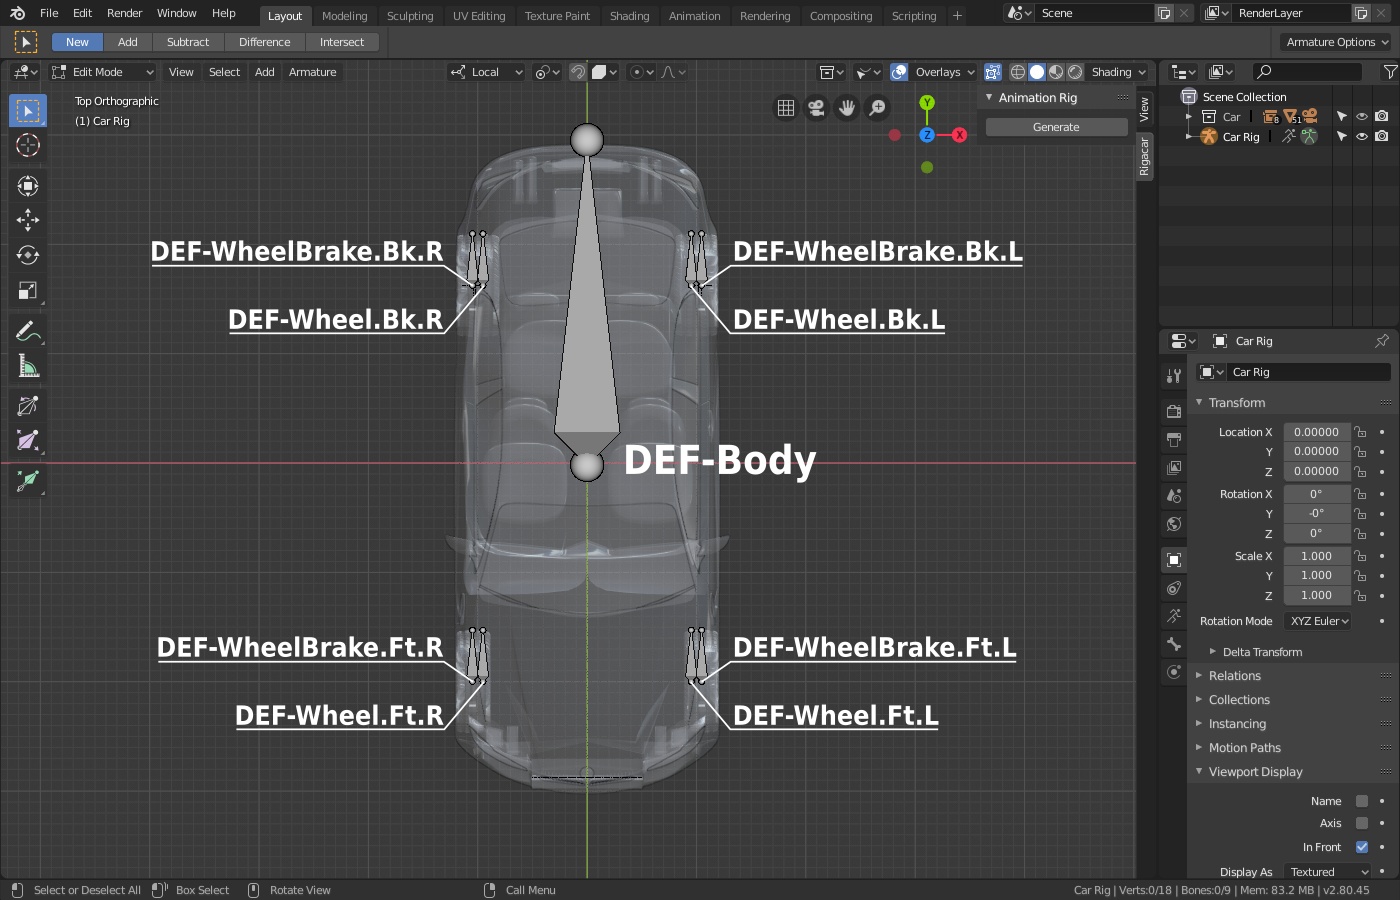
In the model below, you see the origin point and the name of each reference objects:
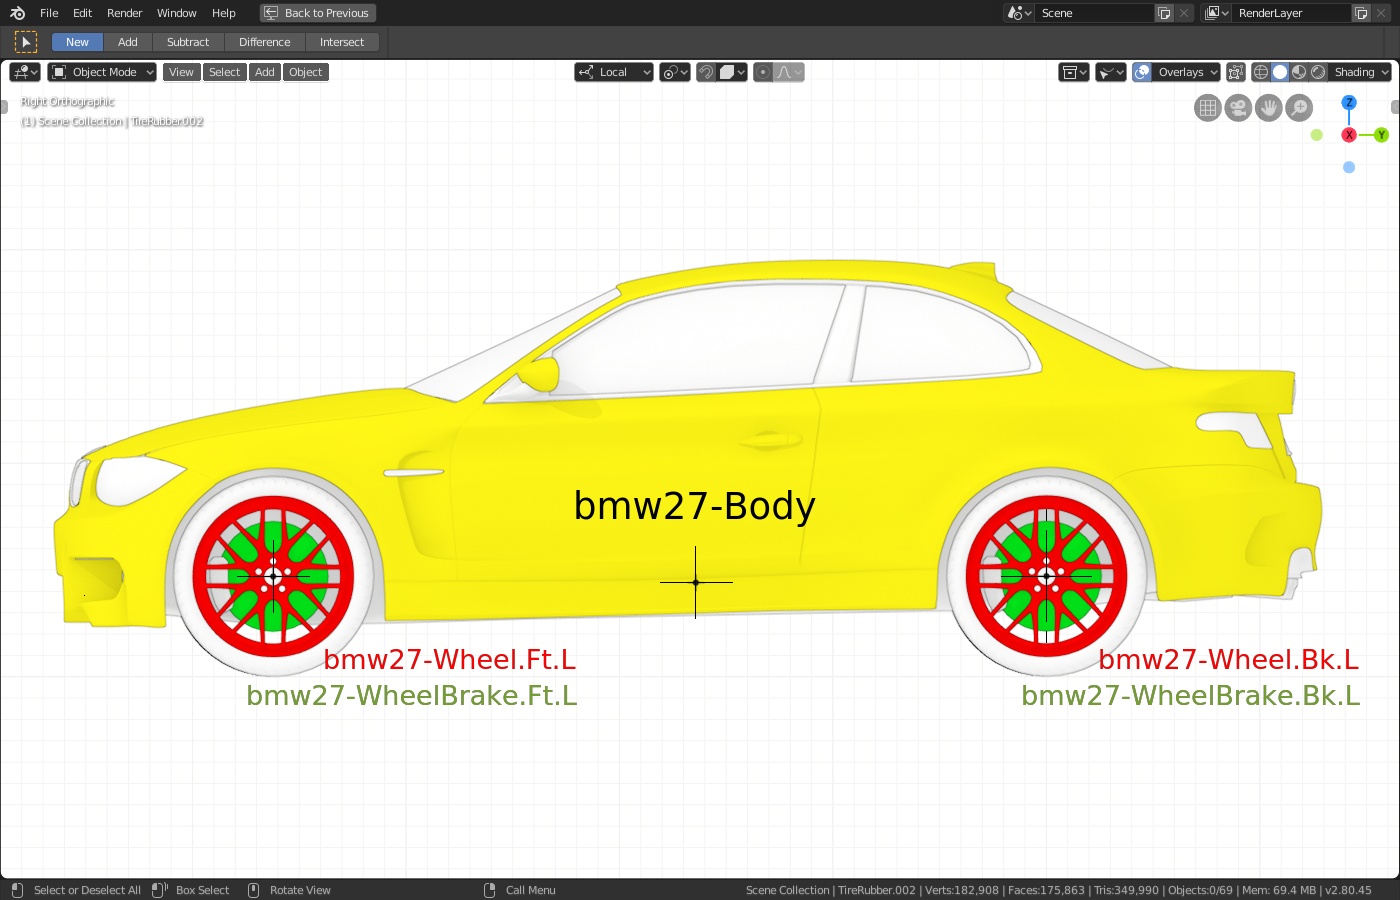
In the previous image, reference object for the body is yellow, reference objects for wheels are red and reference objects for brakes are green. All other objects are white and are parented to one reference object.
Add the deformation rig
Once you have installed the add-on, you can add a new kind of armature in your scene: a car deformation rig. It is an armature with only bones used to animate directly your model: the body, the wheels and the brakes.
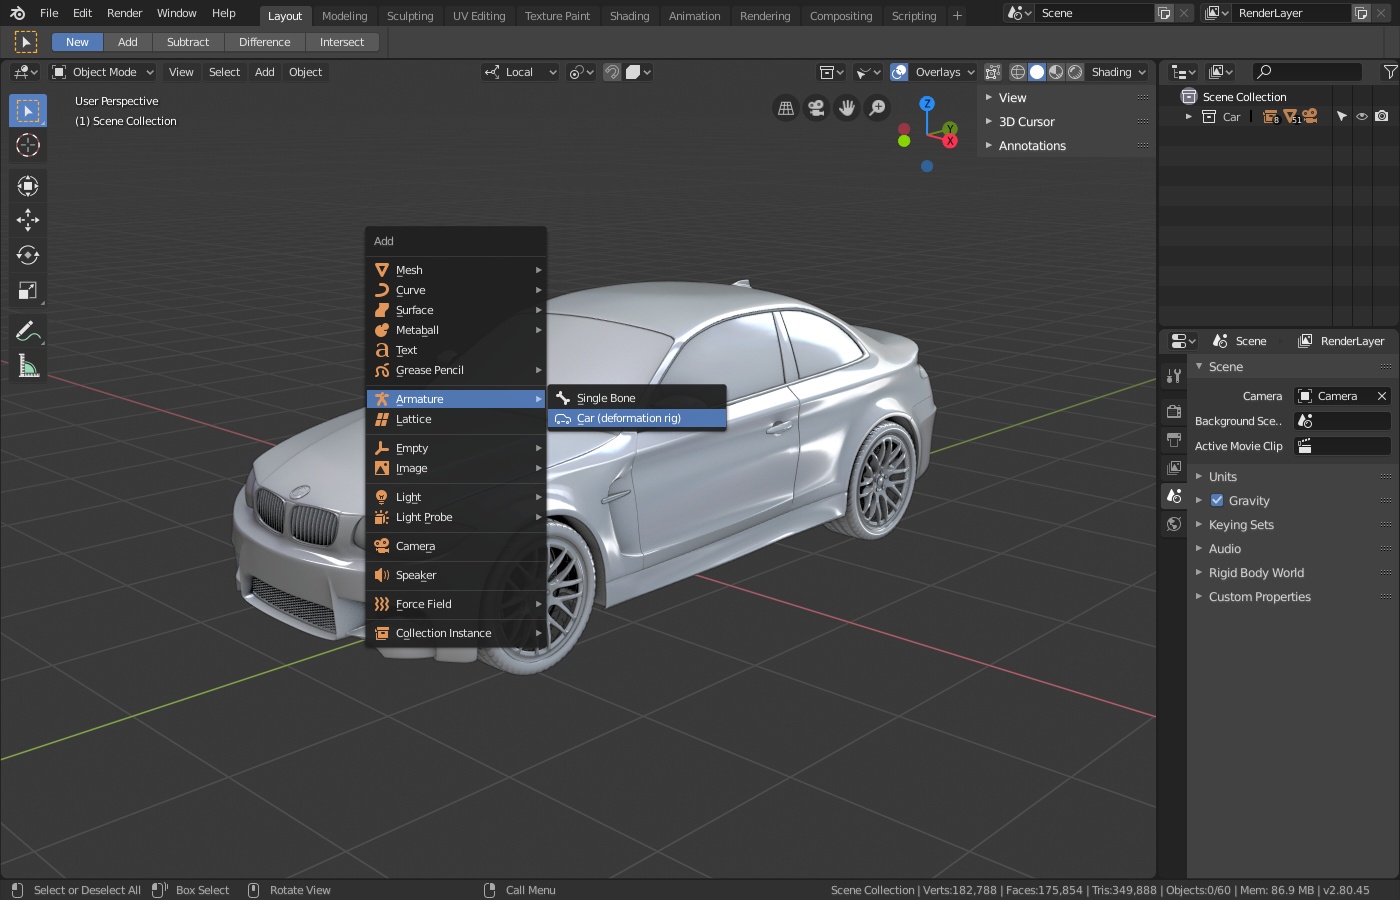
When you add such an armature, Rigacar will try to discover reference objects amongst the selected objects. For each one found, Rigacar will automatically position the associated bones at the same origin point and will parent the reference object to the bone.
So the rule of thumb is: select all the objects of your model, add the rig and let the add-on do the job for you.
Note
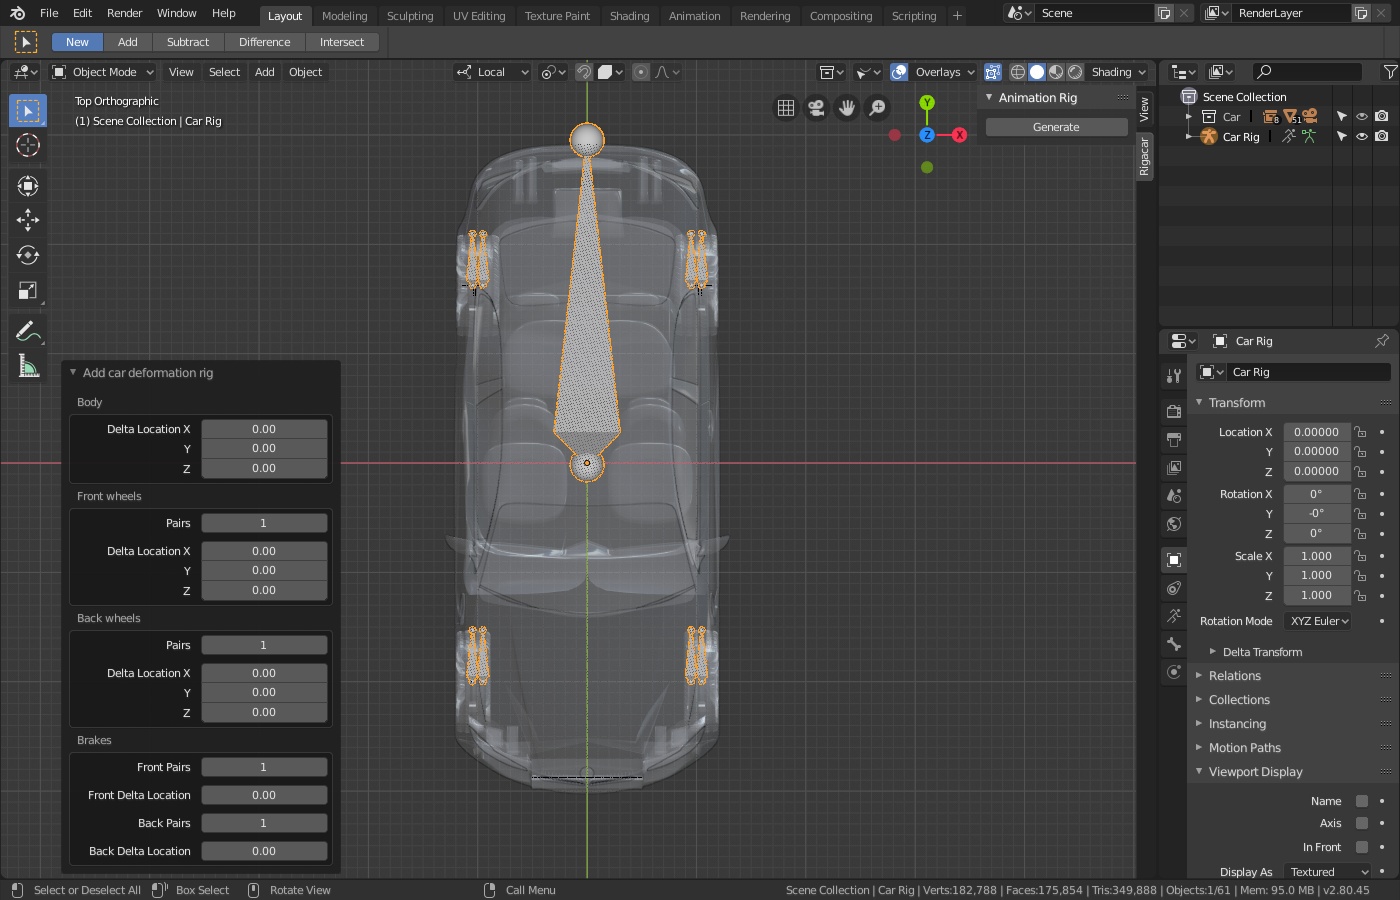
If needed, you can use the operator panel to tweak the deformation rig:
- add front/back wheel pairs. You can even remove front wheels or back wheels
- add bones for brakes
- adjust location of bones
If you have correctly prepared your model, you should not have to tweak the deformation rig. If the rig seems not correct, it could be difficult to tweak it by hand. Consider checking the name and origin point of your objects then add the rig again. Most of the time, it's just about using an iterative process.
Each generated bone is named following the same convention as the reference objects:
| DEF-Body | Deformation bone for the body |
| DEF-Wheel.Ft.L | Deformation bone for the front left wheel |
| DEF-Wheel.Ft.R | Deformation bone for the front right wheel |
| DEF-Wheel.Bk.L | Deformation bone for the rear left wheel |
| DEF-Wheel.Bk.R | Deformation bone for the rear right wheel |
| DEF-WheelBrake.Ft.L | Deformation bone for the front left brake |
| DEF-WheelBrake.Ft.R | Deformation bone for the front right brake |
| DEF-WheelBrake.Bk.L | Deformation bone for the rear left brake |
| DEF-WheelBrake.Bk.R | Deformation bone for the rear right brake |
If your model has more than one front or back pair of wheels, additional bones will have name suffixed by a number: DEF-Wheel.Ft.L.001 or DEF-Wheel.Ft.R.001 for instance.
Generate the complete rig
Once the deformation rig is added, you can now generate the complete rig.
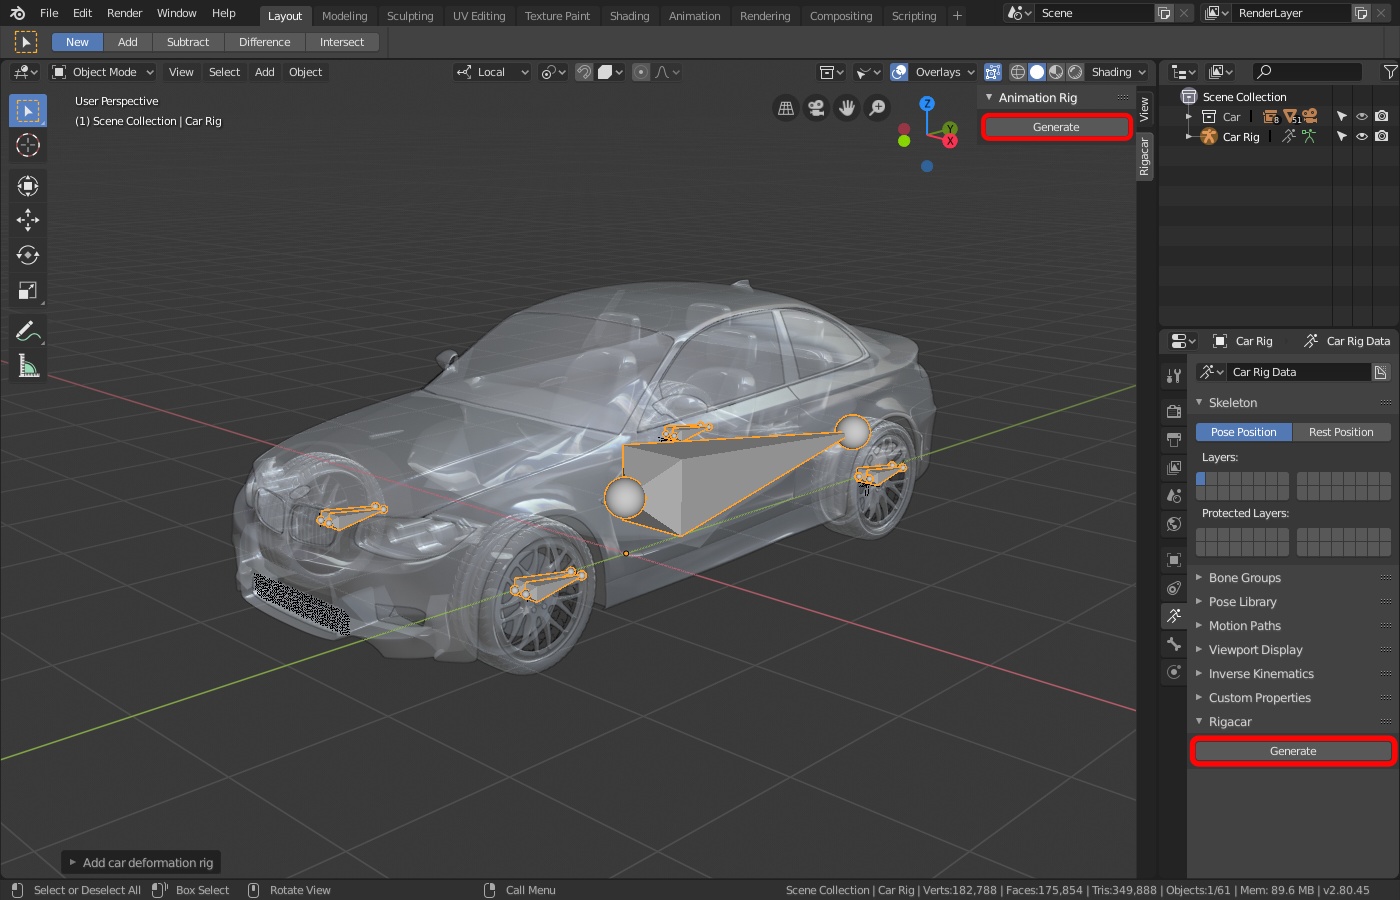
Use the button Generate available in the properties panel in the 3D View. You can also find the same button in the properties of the armature.
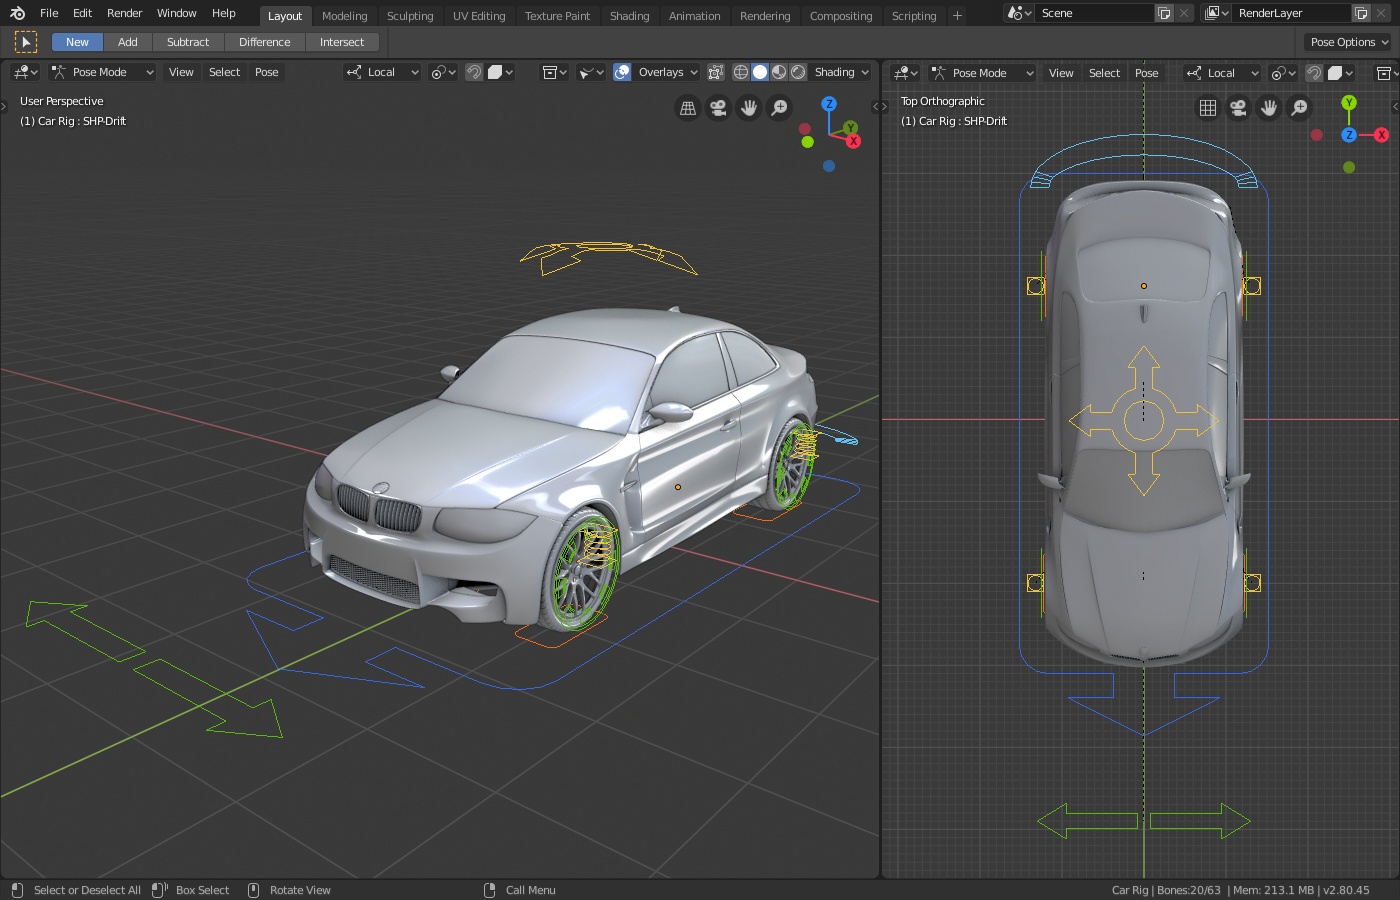
The complete rig is generated and the animation widgets are dispatched over several armature's layers:
- Layer 1 (blue widgets) contains the root widget for the overall model and the drift widget to control location and orientation of the car
- Layer 2 (yellow widgets) contains the suspension widget and one damper widget per wheel
- Layer 3 (green widgets) contains widgets for front wheels, back wheels, brakes and steering
- Layer 4 (red widgets) contains the ground sensors (one per wheel and one per axle)
- layer 14 contains bones necessary to tweak the position of the widgets
- layer 15 contains main mechanical bones (useful to extend the rig)
- Layer 16 contains deformation bones (those originally added by the deformation rig)
- Layer 32 contains all mechanical bones (no need to have a look at it).
Layers 1, 2, 3 and 4 are useful for animators. Layer 14 is useful for riggers to tweak the generated rig (see below). Layer 15 is useful for riggers who want to extend the rig with more bones. For instance, if you want to add bones to control side doors, you should parent these new bones to MCH-Body from this layer.
Tweak the generated rig
Once you have generated the animation rig, you may need to tweak it.
Check the spinning of the wheels
The animation rig can rotate wheels as you move your model along the Y axis.

Be aware the spinning is only correct for translation on the Y axis. So, this feature is not the proper way to animate wheels with Rigacar (see section below). But it is useful to quickly check the generated rig. In the properties panel, put the property Wheels on Y axis to 1 to activate this feature. Don't forget to set it back to 0 once you have checked your model.
Adjust widgets' location
Rigacar will try to position widgets to match your model. But you can adjust position of widgets and scale them at your ease.
To adjust position of widgets, go the layer 14 of the armature. This layer displays bones useful to tweak position of the widgets. Even if the rig seems to be displayed as usual, the bones are not quite the same. For instance, if you select the widget for the root bone, you will in fact select a bone named SHP-Root. If you are not familiar with creating custom shapes for bones in Blender, the good news is you don't need to fully understand the technical stuff. Just go to layer 14, select the widget you want to move, go to edit mode and change the position of the selected bone and it will update the position of the widget.
To scale up/down a widget, you have to go back to layers 1 to 4, go to pose mode and change the scale of the custom widget from properties panel for the bone.
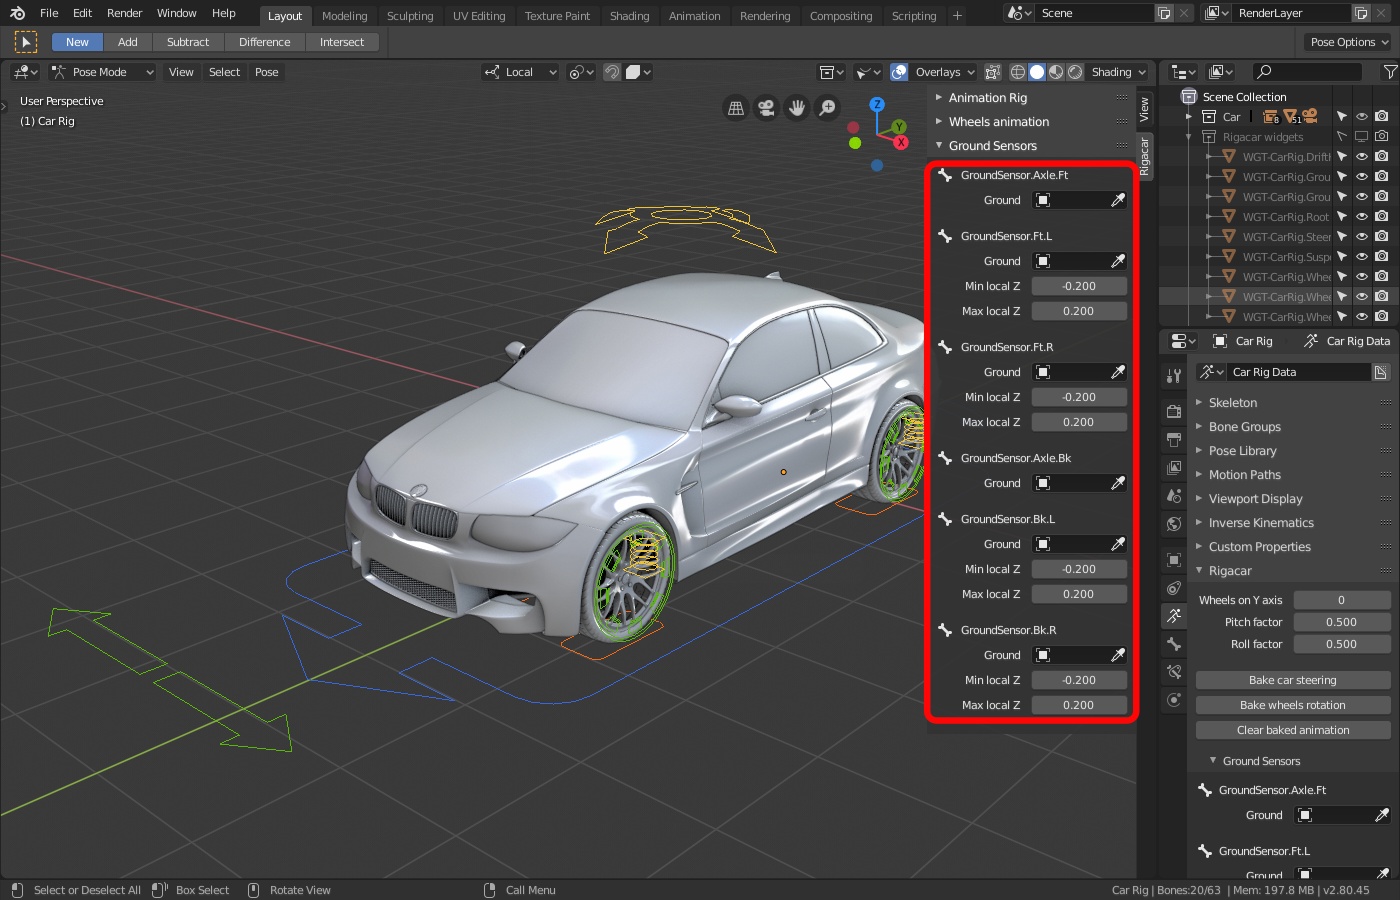
Edit properties for ground sensors
Ground sensors (layer 4) are widgets generated for each wheel and for each axle. They are used to make sure your model will follow the ground of your scene. They are bones generated with a shrinkwrap constraint named Ground projection. This constraint is not activated by default. You can tweak each ground sensor from a dedicated section in the properties panel. You can pick the object for the ground and adjust min/max local Z values to limit wheels vertical position to avoid inaccurate positions (like passing through the body). You can also pick the object in your scene which is the ground.
Adjust suspension
Moving ground sensor and damper widgets has an effect on the body of your model. Animation of these widgets is supposed to be subtle. Otherwise, your model will be stripped away. If you want, you can adjust this suspension effect in the Animation Rig panel.
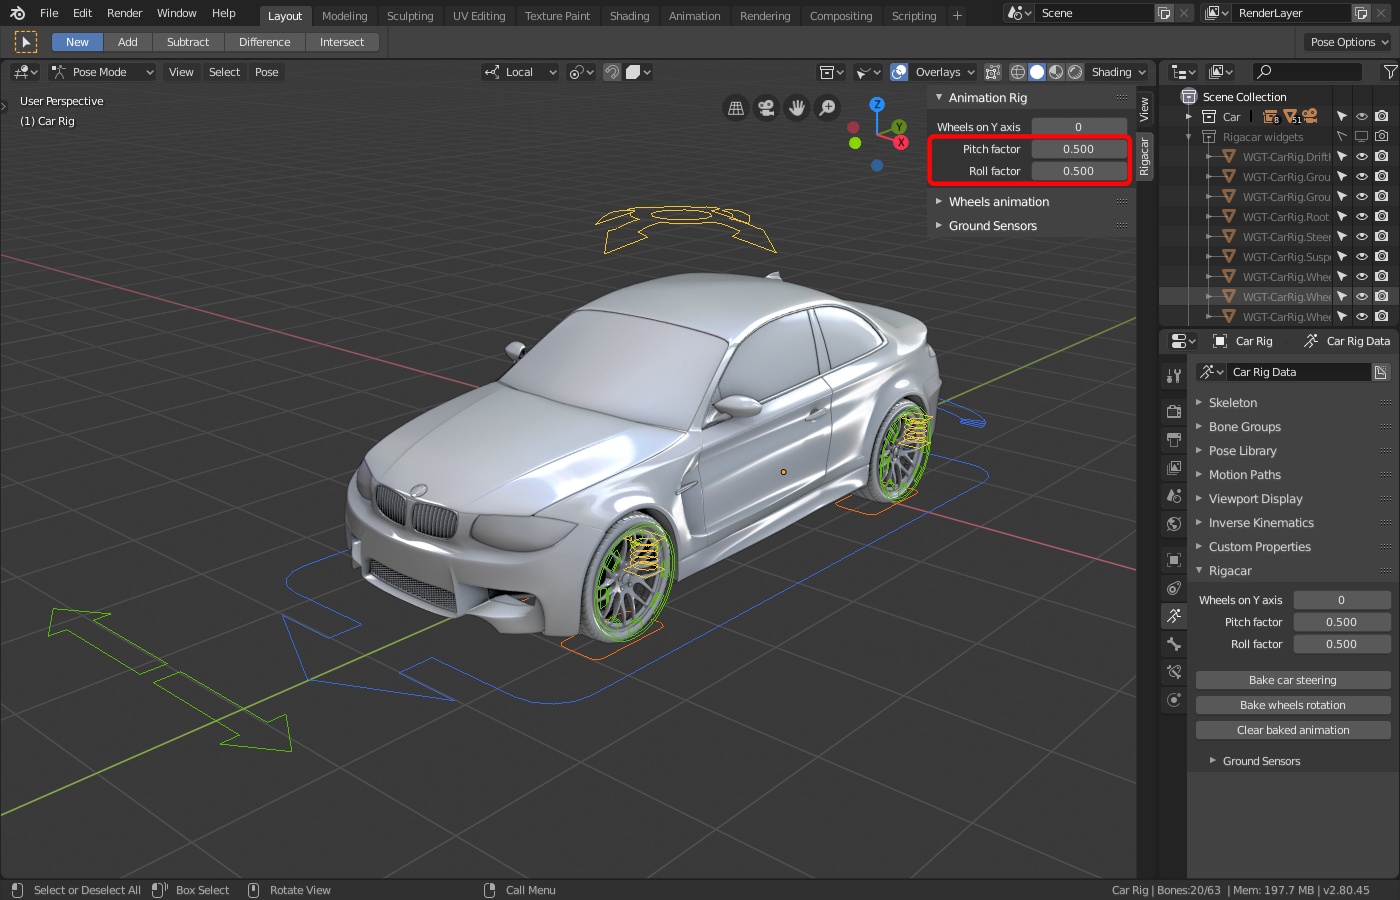
- Pitch factor
- This factor adjusts the variation on the local Z axis of the body when ground sensors and/or damper widgets are moving.
- Roll factor
- This factor adjusts rolling of the body on the local Y axis when ground sensors and/or damper widgets are moving.
If you want to keep full control on your animation, you can turn these factors to 0 to deactivate any effect from the suspension.
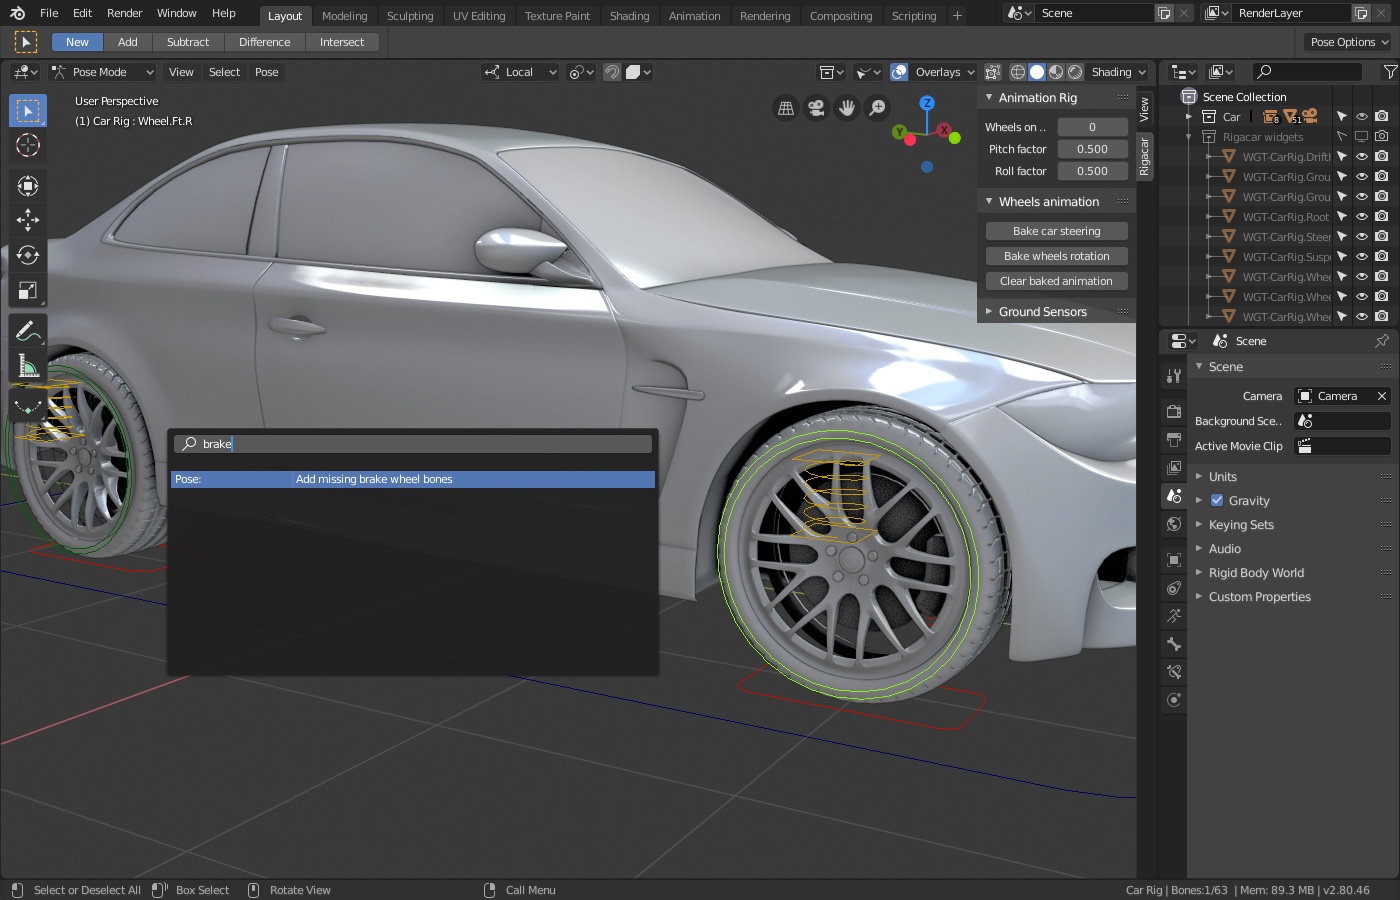
Add widgets for brake
By default, Rigacar generates one widget for brake at the front and one at the rear. These widgets can be scale in/out to simulate the effect of brakes. Rigacar will take them into account for generating the spinning of wheels (see next section).
You may need to have more widgets for brakes if you want to animate wheels independently. To add more widgets in pose mode, select the wheel widget to indicate which wheel must have its own brake widget. Search for the operator named Add missing brake wheel bones by pressing F3 (search mode since Blender 2.8x).Then press Enter and the additional widget will be added.
Bake wheels animation
Most of the time, you don't really need to animate wheels. Rigacar can bake the animation for you based on the motion of your model. So you should not animate the steering widget nor widget for wheels but use buttons to bake their animation.
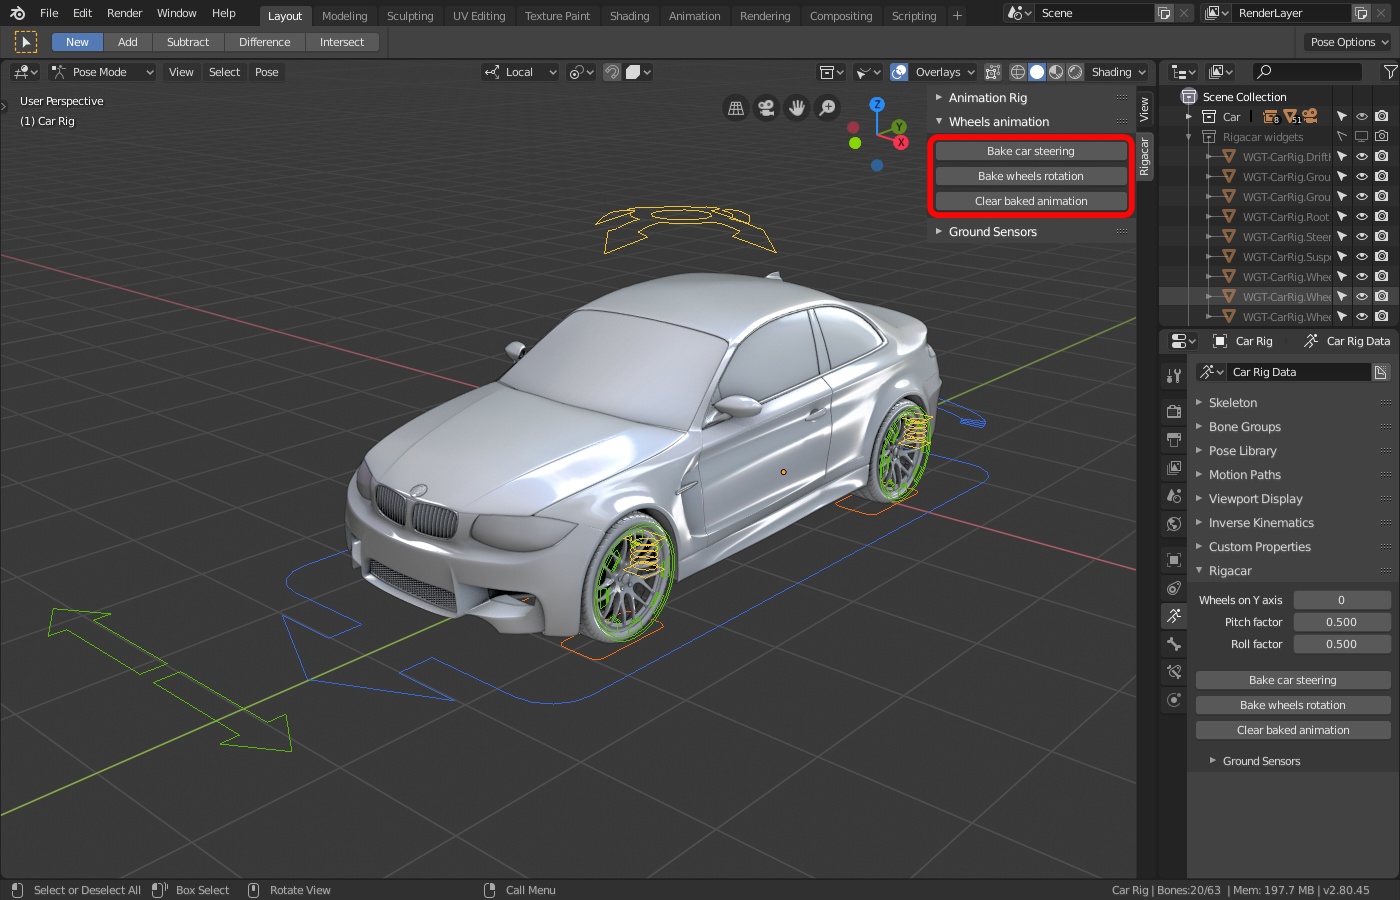
Bake steering
The button Bake car steering computes animation of the steering. When you click on it, a popup dialog is displayed to adjust baking parameters:
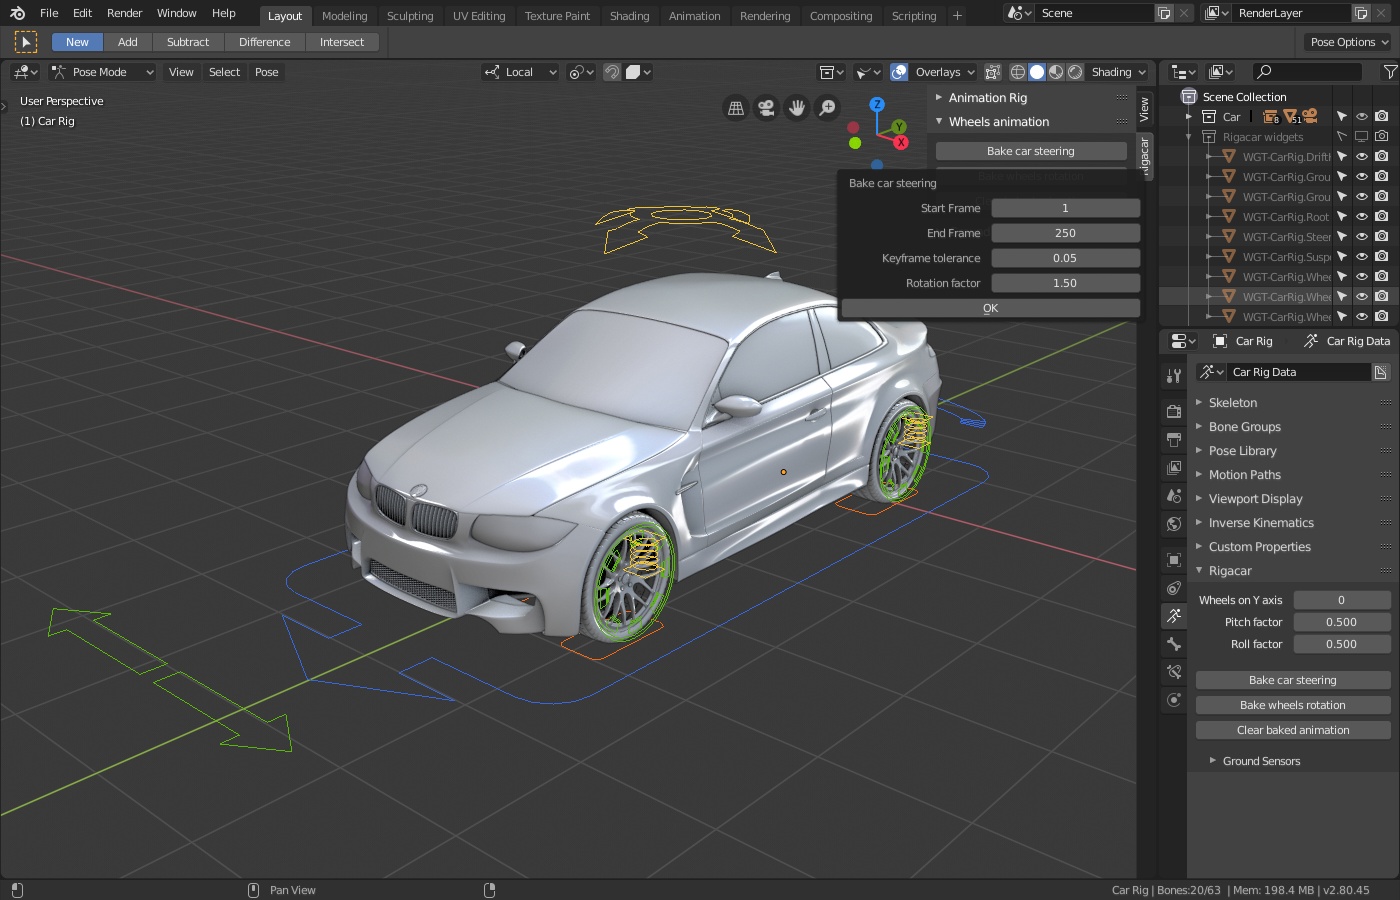
- Start frame and end frame
- The range for the animation. By default it matches the range of the current animation. You can adjust it if you like.
- Rotation factor
- The value is used as a factor to adjust strength of the steering. If you want to create animation with a more noticeable animation of the steering, you can use a higher value.
- Keyframe tolerance
- Rigacar can try not to add keyframe if it is not necessary. If you want to remove some noise in the animation, you can crank up this value: Rigacar will become more and more tolerant and will ignore significant variations, adding less keyframes. On the contrary, if you set this value to zero, Rigacar will add keyframes for each frame. You should not have to modify this parameter. Try tweaking it only if you get some weird result.
Bake wheels rotation
The button Bake wheels rotation computes spinning of the wheels. Rigacar takes into account the brake widgets to animate the wheels. When you click on it, a popup dialog is displayed to adjust baking parameters:

- Start frame and end frame
- The range for the animation. By default it matches the range of the current animation. You can adjust it if you like.
- Keyframe tolerance
- Rigacar can try not to add keyframe if it is not necessary. If you want to remove some noise in the animation, you can crank up this value: Rigacar will become more and more tolerant and will ignore significant variations, adding less keyframes. On the contrary, if you set this value to zero, Rigacar will add keyframes for each frame. You should not have to modify this parameter. Try tweaking it only if you get some weird result.
If you want to animate skidding during braking, you can activate brakes on wheels. Scale down brake widgets, add keyframes then hit Bake wheels rotation again.
Clear baked animation
Sometime, you want to remove animations generated by Rigacar for steering and wheels. In this case, click on the button Clear baked animation. This will reset bones rotation and remove generated keyframes.
Advices and reminders
Based on many feedbacks and comments, I added this section to share tips for avoiding common mistakes and creating better animations.
Rigacar is no car simulator. Don't expect to see you model drift or any kind of nice things happens automatically. Sorry, It's just a rig generator. you have to do the animation yourself. At least, it provides a quick and easy way to generate keyframes for wheels animation. Probably could do much more but not at the current state...
Unfortunately Rigacar is not able to rig three-wheeled vehicle or bike. It is designed for vehicles with one or more pairs of wheels. Anyway, Jamis made a tutorial to rig a three-wheeled car with Rigacar (many thanks to him):
This tutorial could be useful but the generated rig is not 100% efficient (there are some issues with suspension). But if it is good enough for you who cares it is not 100% efficient.
Do not add a new rig in a non editable collection, it will not work.
The easiest way to animate your model is by making it following a curve object. You can use follow path constraint on the root widget as a bone constraint in pose mode (take care not adding the constraint on the armature itself).
With follow path constraint, checked the option Follow curve and use -Y for the forward direction because your model is supposed to be aligned along -Y axis.
If you use a curve as a path for your model, do not use the default value of Resolution preview U for the curve (a value of 100 is generally fine). Even if the curve seems smooth on screen, it could create jagged animation because curves are only sampling of points. Resolution preview U defines the resolution of your curve and is available in the Object Data Properties panel.
When you use ground sensors, make sure you apply scale on the mesh object used as the ground in your scene. Otherwise, you may ended up with a model floating above the ground.
After baking animation for wheels, it could seem the wheels are not spinning in the right direction (going backward while the model is going forward) or the wheels are barely spinning. You can check the generated animation curves in the graph editor but it is more likely an optical effect. It happens in movie, it happens in life and it happens in Blender. To know more, read this article. Try using motion blur at render time to have a more realistic effect.
If you want your model to go forward and backward in the same scene (in a car park animation for instance), the best method I know is to use multiple curves. Obviously, the last control point of one curve must be at the same location as the first control point of the next curve. But to achieve a smooth animation, the second-last control point of one curve must be at the same location as the second control point of the next curve. You have to animate the motion of the root widget along these curves using several Follow path constraints. You also have to animate activation and deactivation of these constraints along the timeline.
To infinity and beyond
I would be glad if this add-on could be useful to some of you. I am no professional rigger nor animator. So I am pretty sure this add-on and the generated rig can be dramatically improved. Use them in a way I have not imagined and give me feedbacks. You can use the comments below, you can create an issue on GitHub and, of course, you can fork my code.
Originally, I was inspired by Ondrej Raha's add-on. I eventually realized it would not provide the features I was looking for. So I decided to write my own add-on and finally to share it with the community. Thanks to him for giving me inspiration.
Drive safely :)