

Note
Important update since 2019-03-04
If you use Blender 2.80 or later, you do not need anymore the normal to map node. Blender 2.80 now takes into account normal information created by your material when you bake the normals. Thanks to the Blender developers.
If you have ever tried to bake normals in Blender using Cycles render engine, you probably noticed the following behavior: the bake process uses only information from the mesh geometry and ignores normal variations created by your material. It means that if you use normal map and/or bump map, they are not taken into account.
If we think about it, it should not be really surprising: as Cycles is based on a nodal system, we can create materials with infinite combinations, we can even use one normal map for diffuse shader and another for glossy shader. It provides complete artistic freedom... but this also means Cycles cannot identify which part of your material is related to normal computation. So the bake tool has no other option than completely ignores effects created by your material when you choose normal as the bake type.
Too much freedom leads sometime to frustrating limitations! Actually, baking normals including material effects is really useful for at least two reasons:
- If you use a normal map to catch details from a high resolution model and a bump map to paint additional details, you probably combine them in your Cycles material. But if you want to export your model in other render engines, some of them (especially real time renderers) allow to use either normal map or bump map but not both of them. You shoudn't have to choose between one map or another...
- If you use high resolution textures, it could be interesting to merge information from normal map, bump map and procedural normal textures into a single normal map to reduce memory footprint and simplify your material.
Note
The Material Output node in Cycles has the Displacement dedicated slot. If you use this slot in your material it deactivates all Normal slot from all nodes. But as it also clearly indicates to Cycles how your material is affecting the geometry, then the effect of the displacement will be included in the bake process.
Even if it is not straighforward, you can actually create normal map including effects from your material in Cycles. I found several ways to achieve that. All of them, as far as I can judge, are mathematically correct (otherwise the final normal map would create slightly different effect than the original material). From my perspective, the most effective way was to create a special node in Cycles. I called it normal to map. In this article, I will explain how to use it and the math foundations behind it.
If you just want to use the normal to map node, you can download the blend file. The file contains a very simple example and the node itself. This file is licensed under CC0 1.0 Universal so you can freely use this node for your own purpose.
For the rest of this article, I assume that you are familiar with Blender, Cycles and the bake tool in Blender.
How to use normal to map node
The normal to map node is designed to be used when you want to bake normal information from your material in Cycles. So you should add it just before the baking process and remove it from your material afterward.
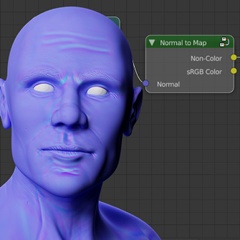
Material using the normal to map node
The input slot Normal expects the same input as standard BSDF nodes and it is the normal you want to bake. There are two output slots: sRGB color and Non-color. You must use the same output as the color space of your baking texture. By default, Blender creates a texture in sRGB color space.
I encourage you to use the Non-Color format: less computation is required (no gamma correction applied) so it should avoid some rounding issues during computation. You can change color space of your texture in the properties panel in the UV/image editor.
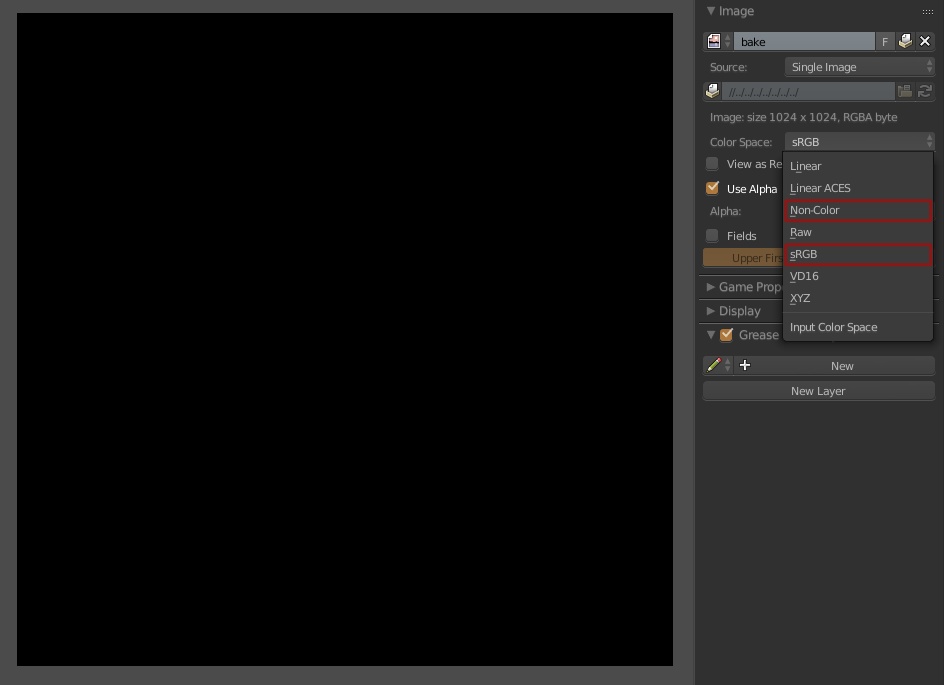
Texture color space in the UV/image editor
Note
For people using the Filmic Blender color management, sRGB is labeled sRGB EOTF and Non-color is labeled Non-Colour Data.
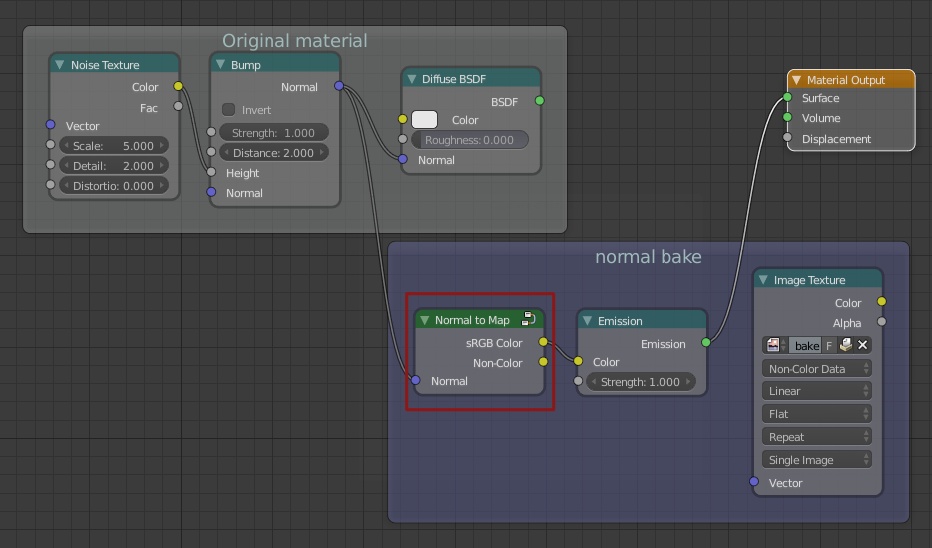
Usage of this node follows these steps:
- add the 'normal to map' node to your material
- plug in the normal you want to bake to the input socket
- plug the chosen output slot to an Emission node (ctrl+shift+left click if you use the Node Wrangler addon)
- in the UV/image editor, create a new image
- in the properties panel of the UV/image editor, choose the same color space as the output socket
- add a texture node in your material and select the newly created image
- in the bake tool, select the type 'Emit'
- click the bake button
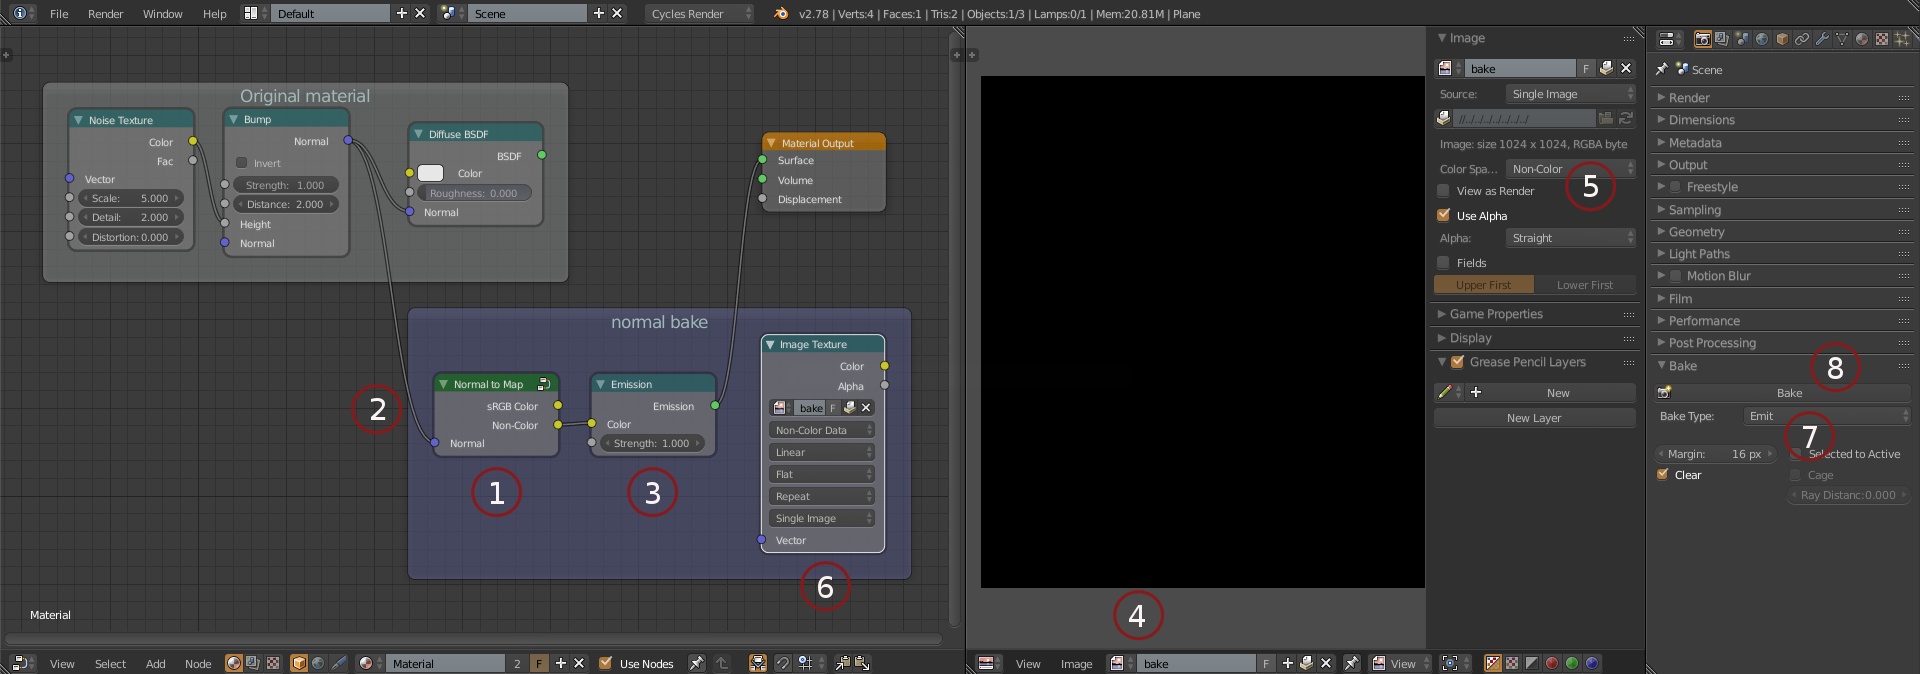
Preview of all necessary steps
The node creates the appropriate colors to represent the normal information. So you must use an emission shader as if the object would emit normal information. As pure emission material is not affected by fireflies and light bouncing, you can use only one sample for rendering. It means that the baking process is super fast!
Performance improvements
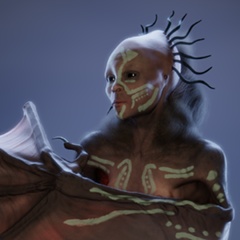
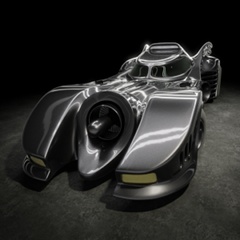
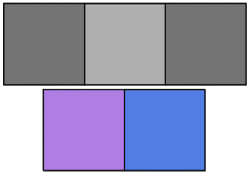
Creating one normal texture to replace part of a material can provide interesting improvements. Consider the images below. For the first one, the material of the body uses a normal map, a bump map and a procedural texture to generate additional normal variations. For the second one, I baked the normal from the original material using the Normal to map node. I saved the result in a file and I created a much simpler material using the baked normal map.
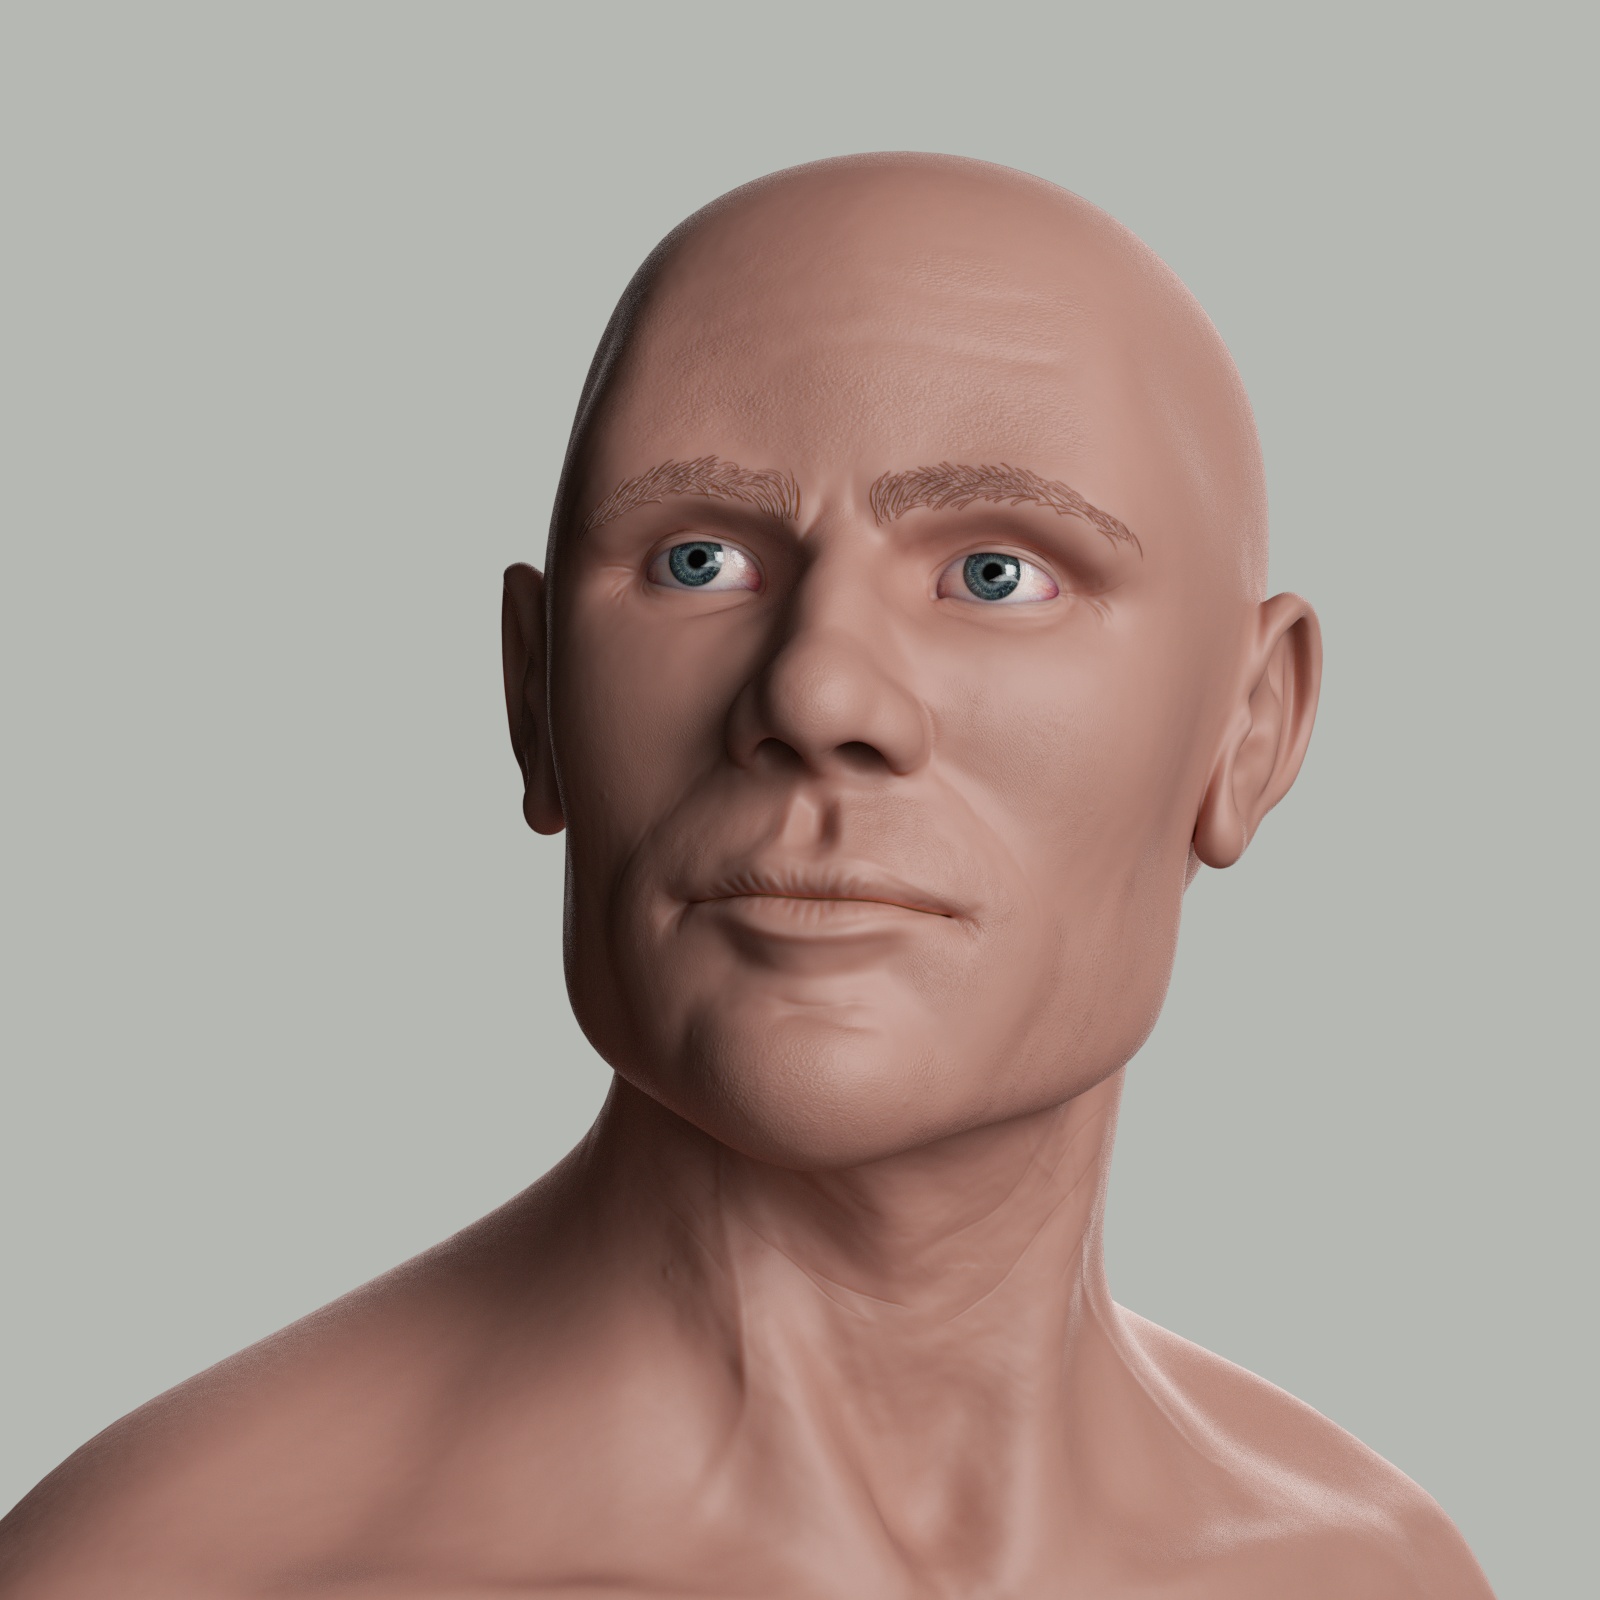
Using the original material

Using the normal map baked with the Normal to map node
The following table shows some figures about the renderings:
| Material | Rendering time | Memory peak |
|---|---|---|
| Original material | 16:03 | 1371 Mo |
| Material using baked normal | 13:55 | 350 Mo |
For this model, using a simpler material has a real impact on performance!
Known issues
Due to internal computation, you can get slight variations of the normal computed by the Normal to map node and the original material. As these variations are really subtle there are completely unnoticeable.
The Normal to map node is dramatically affected by rotation and scale of your model. Don't forget to apply transformations in Blender before baking.
The most annoying issue does not come from the node itself but from the bake process. If you look closely at the two images above, they seem to be identical... but they are not! If you open these images into separate tabs at full size and switch between them, you will notice a weird effect: some details seem to slip over the surface! Look at the image below to see this effect:
The slip over effect between original material and material using the baked texture
It took me a day to convince myself this effect was not created by the Normal to map node! Actually, the problem comes from the integration of the bump map into a normal map. To summarize, bump map stores height information while normal map stores variation of height. It means if a texture contains three pixels to represent a bump map, each pixel represents a different height. To achieve the same result with a normal map, the texture must contain at least two pixels to encode the variation of height. But most of all, there is a shift between the bump map and the normal map.
Shift between bump map and normal map
So when we want to convert directly or indirectly, bump map info into normal map info, we get a shift of information in the final texture. One way to avoid this is to use a texture with higher resolution for the final bake. But it is not always desirable.
So if you plan to use the Normal to map node be aware of this effect, especially if you want to create close shot of your model.
How normal to map node works
This section covers what happens under the hood. You don't need to understand that part to use the node. But if you are interested in the math, let's start with normal map.
Obviously, normal map has nothing to do with color! A normal texture is an image and we can open it into an image editor. But it is not really an image because each pixel (or to be precise each texel) is not a color information: it is a normal information.
What is a normal? A normal is a vector perpendicular to a surface. Why is it so important? Because the normal is used to define what is the front of a face and what is the back. More importantly, the normal is used internally in almost any shader node. For instance to define how the light bounces over the surface. If we can cheat and slightly modify the orientation of the normal over the surface we can change the way the light bounces, create fake bumps and simulate non existing geometry. This is precisely what normal map is used for.
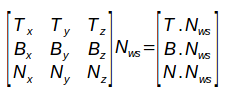
Normal texture stores normal variations considering the original normal coordinates are (0,0,1). It means that the coordinates must be in tangent space. And that's the point: Cycles provides normal information in world space. In order to bake normal, we have to transform normal vectors from world space to tangent space. So, we have to do the following operation:
Where Nws is the normal vector in world space (the one created by the material), M is the tranform matrix from world space to tangent space and Nts is the normal vector in tangent space (the one we want to get). The tranform matrix M is a 3x3 matrix composed in line by the tangent vector, the bitangent vector and the original normal vector of the face:
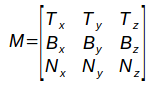
Cycles provides tangent vector and normal vector for the current face. We can easily compute bitangent vector as the cross product of normal vector and tangent vector. However, Cycles has no support for matrix operation but we can easily decompose the operations:
and create the node set to do the math:
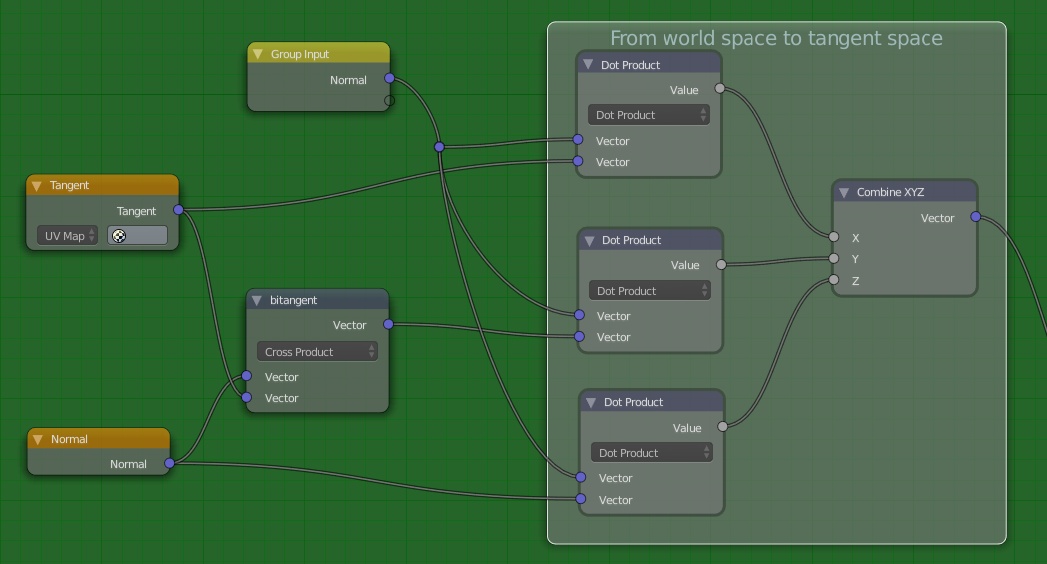
From world space to tangent space in Cycles
All this could have been much simpler if the Vector Transform node accepts tangent space... could be an interesting improvement.
Then we have to encode vector coordinates into color values to create the final normal texture. As normal vector is a unit vector x, y and z coordinates are between -1 and 1. We have to transform these coordinates to color values between 0 and 1. The Vector Curves node can do the math for us.

Converting vector to color
Finally, sRGB color space means that Blender will apply a gamma correction of 1/2.2 because file formats with 8 bits per channel (PNG, JPEG...) must pre encode color values like this. But as normal texture does not contain color values but encoded vector coordinates, we must prevent this by applying the inverse gamma correction of 2.2. Using a non color space for the bake texture is straightforward because we inform Blender we want to use a linear color space (no gamma correction is needed).